Friday, October 26, 2012

Honey Do Wear Your Heart on Your Sleeve

I know it has been awhile since I have blogged. It has just been so gloomy and dark around these parts that it has been hard to get motivated. It even snowed yesterday. It was hard to be upset about it because it truly was a beautiful snow fall. And the kids were so happy to see it! "B" even wanted to take his snowmobile out. Yes, I know he is only 4 and has his own snowmobile. But, it is the cutest thing ever! Hey, we live in Minnesota. Would you expect any less? 

So, anywhoo! I have not only been slacking on my blog but I have also been slacking at the gym. But, I have been making up for it these last few days. Today I ran a treadmill 5k in my best time and then walked until I made it to 4 miles. Then I pumped some iron. No, not really. I just used the weight machines in the Women's area of the gym I go to. In total I worked out for an hour and a half. I am going to wear my heart on my sleeve here for a bit folks...

In high school I ran track and was in the best shape of my life. However, this is TOTALLY what I thought of myself...


It is a very sad truth. I wish I had some pictures of me from High School on my computer so I could show them to you. Or have my picture albums down from the attic so I could scan them and show you... But, I don't. So, you are just going to have to picture it on your own. I was 5' 8" (I still am by the way. No shrinkage yet!) and averaged at around 145 lbs, give or take. That converts to a BMI of 22 (normal BMI for a healthy adult women is around 18-25).  I seriously thought I was FAT!!!!! I remember asking my mom before every meal if it was going to make me fat. Or going school clothes shopping and crying in the dressing room because I thought I looked FAT in my size 28x33 Silver jeans (I think that converts to like a size 7/long). I would do ANYTHING for that body back and to think that I beat myself up about it (I am shaking my head as I type this). It brings tears to my eyes in knowing how blind I was and how MEAN I was to myself. Teenage girls can be mean, but I think they are the biggest bullies to THEMSELVES. 

So, long story short...
I was at this weight when my husband and I started dating. I was going into my Junior year of High School and he had just graduated...holla! An older guy! So, obviously he was attracted  to the "thin" me. So, now that I have had two babies and gained X amount of pounds since then, (I am not going to tell you how many pounds because then you would do the math and then I would be TOTALLY embarrassed that I have let that happened.) I feel like I have let him down. Even though he has never once told me that I have let myself go or that I need to loose weight, I still feel that I have let him down. What guy doesn't want a SMOKIN' wife? 

So, short story long...
I have been making an effort to loose the extra poundage. I lost most of my baby weight and more after my first pregnancy only to...Whamoo, get preggers again! Well, my baby is almost 2 1/2 years old and I am now FINALLY almost back to my prepreggo weight.  Considering I was chubbier then I would have liked to be when I got pregnant in the first place, I am pushing myself to go further then just prebaby weight.  But, the funny thing is that even with my weight gain over the years I have NEVER been as mean to myself as I was when I was at my lowest weight. Age, it changes your perception on things I guess? 

But, I am proud to say that counting my calories (I am not as consistent with that as I should be) and going to the gym has given me some improvements. I am now down 34 lbs in one year. Slow and steady wins the race people! 

This picture is from last Christmas 2011. 
I am not going to be mean to myself and say something like...Hubba Hubba look at that Chubba! 
Sorry, I had to. 

This was taken in September 2012. 
Aren't we cute? I love my little family. They are my motivation. 

My husband and my kiddos truly are my motivation. I want to be as healthy as I can be for them. I want to be able to move around easily and play with my children. I want to get out of bed in the morning and have energy for them. I want to make healthy meals for them. I want to be able to go on a 12 mile family bike ride without getting winded. I want to be able to go to the beach or pool with my kiddos and not feel self conscious in a swimming suit. I want to be a role model for my kids. I want my husband to be proud of me. I want my husband to give me the "head to toe" look and smile. I want to snuggle with my husband and not feel like I am crushing him...haha! 

Thank you for reading my blog post. I hope you enjoyed me laying my heart on my sleeve. Hopefully it gave you some inspiration to be the best YOU and the healthiest YOU. Also, try not to beat yourself up. Things will never change, in fact they may get worse if you do. But, also remember to not live in denial.

Love Yourself!  
...and don't forget to work for it. Your body will thank you. 


Friday, October 12, 2012

Honey Do Bake Soft Molasses Cookies with Vanilla Frosting

I know another cooking blog post. I am sorry but it is Fall! Fall and baking just go hand in hand. Don't they?

My parents hosted their Annual Bouja Party this past weekend with a heated out house and all. Those of you who do not know what Bouja is you must not be from Minnesota or you must not be of German dissent. I am only kidding. It is a fall harvest soup. Everyone brings their veggies harvested from their gardens: beans, carrots, potatoes, tomatoes, rutabagas, onions, etc.. Pretty much everything goes into this soup along with chicken, beef and pork. It all gets mixed together in one GIANT pot. Like a witches brew pot. My hubby even had to carve a wooden spoon from a tree with his chainsaw to stir it. I am serious! I am not kidding. I know...I know...what hicks! Hey, it was a good time and my cookies were a hit. I am sorry I did not take pics at the Bouja Party. I was too busy chasing my little ones around. I know, bad excuse. So, anywho! Back to the...


Soft Molasses Cookies with Vanilla Frosting

This recipe is from my favorite wedding gift the Betty Crocker COOKBOOK


Ingredients: 

1 cup sugar
3/4 cup sour cream
1/2 cup butter or margarine, softened (I used butter) 
1/2 cup shortening
1/2 cup molasses
1 large egg
3 cups all-purpose flour
1 1/2 tsp baking soda
1 tsp ground cinnamon
1 tsp ground ginger
1/2 tsp salt 
(I have oil in the picture above. Sorry, no oil is used in this recipe. I don't know what I was thinking.) 

Frosting Ingredients:

3 cup powdered sugar
1/3 cup buter or margarine, softened (I used butter) 
1 1/2 tsp vanilla
2 to 3 T milk 

(This recipe will make about 4 dozen cookies) 

Instructions:

1.) Heat oven to 375*

2.) Then pour yourself a glass of wine. I was making these cookies at 7:30 on a Friday night while my husband was carving (all Chainsaw Massacre like) his spoon. I figured I deserve a glass of wine at the end of the week. Right? Right! 


3.) In large bowl, beat sugar, sour cream, butter, shortening, molasses and egg with electric mixer on medium speed, or you can mix with a spoon. 


I used a mixer. FYI...it is a piece of SHAT! 

4.) Stir in remaining ingredients: 3 cups flour, 1 1/1 tsp baking soda, 1 tsp cinnamon, 1 tsp ground ginger and 1/2 tsp salt.


5.) On an ungreased cookie sheet, drop dough  by rounded tablespoonfuls about 2 inches apart. 

(Yeah, I know the picture is side ways. Sorry.) 

6.) Bake 9 to 11 minuets (I only did for 9 minuets because no one likes dried out cookies) or until almost no indentation remains when touched in center. 


Don't they look delish already? It gets better.

7.) Cool 1 to 2 minuets; remove from cookie sheet to wire rack. 


Now its time to make the frosting. 

Instructions:

1.) In large bowl , stir 3 cups of powdered sugar, 1/3 cup butter or margarine softened (again, I used butter), 1 1/2 teaspoon vanilla and 2 to 3 tablespoons milk until smooth. 


Doesn't this Vanilla Frosting look oh so yummy? That is because it is! 

2.) Frost cookies.


...and there you have it! My Hubby said I "NAILED" these! He even made a point in telling my Mom to make sure she had one at the party. I guess later that night my uncle was gorging himself with them when my mom made him stop before eating the last one. He said, "Oh, no you don't!" as she reached for the last one. It is always nice to hear someone was hording your homemade goodies. 

Have a wonderful weekend. 

If you decide to make these cookies, I would love to hear your feedback. 
Thank you! 


Friday, October 5, 2012

Honey Don't Forget to Blog this Week about the Banana Chocolate Chip Nut Bread/Muffins

Oh, my. What a crazy week. Our trusty internet has been on and off for about 5 days! We have had two different guys out this week to "fix" it. It is sad how sheltered we feel in this house without access to the cyber world. Lets just hope I am able to finish this post without getting kicked off.

Enough about my internet sorrows...

Now to the Banana Chocolate Chip Nut Bread/Muffins I was talking about in my last post. This recipe is from my Dearest Mother. It is a recipe that has been passed down from her Grandmother. Just letting you all know...this is the BEST Banana Chocolate Chip Nut Bread/Muffins recipe you will EVER find!

Oh, by the way...as we speak my kiddos are playing with the Play Doh we made last week. Trust me folks it is a wonderful diversion. Ok, here we go on the...

Banana Chocolate Chip Nut Bread/Muffins

Ingredients:


1 cup of sugar
1/2 cup of shortening
2 eggs
3 ripe bananas=1 cup mashed
3 cups of flour
1 T brown sugar
1/4 tsp salt
1 tsp baking soda
1/2 cupped nuts (I used pecans) 
1/4 to 1/2 bag of chocolate chips 
1 cup sour milk*

*1 cup milk and 1 T vinegar let sit for a bit

(This recipe will make two bread loafs, one dozen muffins or one bread loaf and six muffins. I made one bread loaf and six muffins.)

Instructions:

1.) Preheat your oven to 300* F and spray bread pan with non-stick baking spray (or your own method to prevent sticking) and place cupcake wrappers in a muffin tin (or don't use wrappers and spray well). Sorry, I don't have a picture of the muffin tin and wrappers. You are a smart audience and get the point. 


2.) Mash your ripe banana's (sorry no picture). Then add the mashed bananas to a mixing bowl along with the sugar (1 cup), shortening (1/2 cup) and eggs (2).


3.) Cream the mashed bananas, sugar, shortening and eggs.


4.) Add flour (3 cups).


5.) Secret here folks... Add the choco chips (1/4 to 1/2 bag) on top of the flour. Make sure the flour is not mixed into the other ingredients yet. This will coat the chips with flour and keep them from sinking to the bottom of your baked goody. 


6.) Add the brown sugar (1 T). 


7.) Add the salt (1/4 tsp.).


8.) Add the baking soda (1 tsp). 

(This picture is not right side up but oh well.)

9.) Add the sour milk* (1 cup).


10.) Mix all of your ingredients together. What a pretty batter. 


11.) Chop the nuts (this could be done before hand). I chopped approximately 3/4 cups of pecans. I know my knife is ugly. I think my Dearest Mother and Father are getting me a new knife set for my birthday. Lets cross our fingers! 


12.) Add your pretty batter to the muffin pan and bread pan. 


13.) Sprinkle the chopped nuts on top of both the muffins and bread. 


14.) Place pans in the 300* and set timer for 25 minuets for the muffins and 40 minuets for the bread. Then do the toothpick trick. When the toothpick comes out clean your bread/muffins are done. Adjust baking time if needed. Ok...So, I am addicted to Pinterest. I found this idea there. Check it out! A Parmesan Cheese lid will fit a regular mouth canning jar. GENIUS! I LOVE this idea for my toothpicks. Check it out...


15.) Place your bread and muffin's on a cooling rack. 


Then, voilĂ ! Enjoy!


Look at that bread with the melty butter on it...nummo! 


Oh, yeah! Don't forget to leave some over for the kiddos. Look at "T" enjoying his muffin. 


"B" asked for thirds. I had to cut the poor kid off. Call me a bad Mommy...but, I let him have one for breakfast the next morning. What? There is fruit in it.  


I hope you will enjoy this recipe and share your baked goods with your family. Who doesn't love to bake in the Fall? and who doesn't enjoy eating baked goods in the Fall or ever?  I know we enjoyed them.

 Have a wonderful weekend. 


Thursday, September 27, 2012

Honey Do Make Play Doh for the Kids

I had some very ripe bananas that needed to be made into some form of bread (post on that coming soon). So, I wanted to form some type of activity for the kiddos to keep them entertained while I baked. On any other given day I let my little "helpers" into the kitchen. They LOVE helping Mommy bake. Although this is a great activity at our house, "T" (my two year old youngest son) was getting over a cold. I didn't want to risk the rest of the family getting it... So, in this case I wanted to keep the Snotty Nose/Coughing/Sneezing Goo Slinger out of my kitchen. That is so mean! I know. I am only kidding. He was feeling better at this point, I just didn't want to risk it. 

Instead... They got to help make Homemade Play Doh. This recipe is from "B's" (my four year old eldest son) preschool teacher. 

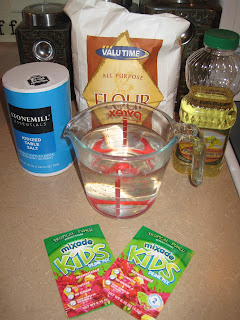
Ingredients: 
2 cups water
2 packets of Kool Aid (preferably same flavor)
1 cup of salt
3 tablespoons oil 
2 cups flour 
food coloring (optional)


Instructions: 

1.) (PARENTS DO THIS STEP!) Bring water to a boil. I filled up my 2 cup Pyrex measuring cup and placed it in the microwave for about 3 minuets. You may need to do more or less time depending on your microwave. Add water to a large mixing bowl.


2.) Add 1 cup of salt. The kiddos can do this step. Just PLEASE be careful with the HOT water. We don't want any scalded children.


3.) Add 3 tablespoons of oil. Again, the kiddos can do this step (even though in this shot I am doing it). It is great for their cognitive thinking...they are ALWAYS learning. 


4.) Add 2 packets of Kool Aid. One pack for each kid in our situation. Trust me...this was a BIG deal while we were making this. As you can see the two spoons. Everything MUST be equal and fair! Oh, my...
You may also add some additional food coloring in this step. I didn't only because I did not have red food dye on hand. I thought it would have been strange to add anything else other then red to Fruit Punch flavor Kool Aid. I know, a bit Anal you may say...


5.) Add the 2 cups of flour.


6.) Let the little monsters stir. Look at those chubby little arms and hands. So cute! 


7.) Mommy or Daddy may need to take over in the stirring department because it starts to get tough. 


8.) Flour your work surface. 


9.) Plop your Play Doh goo onto the floured work surface.


10.) Knead. Mommy did this step because the Play Doh is still a bit warm. You may need to add some more flour to get a silky like consistency. 


11.) There you go! The PERFECT ball of Homemade Play Doh. Did I mention...it smells so GOOD! Oh, and if your darling children decide to eat their Play Doh, that is fine. There is nothing in this recipe that is not edible. "T" had many licks while helping stir...yummy! This is also why I didn't want him to help me bake. He always licks stuff. 


12.) Let them at it. It should keep them busy for at LEAST 15 minuets before they need you for something or they start fighting over the Play Doh scissors. You can give them some toy trucks or in our case snowmobiles (we live in Minnesota) to make tire/ski tracks. Or even toy animals for animal tracks... 

"T"
"B"

Enjoy! 
...and try to get some baking done would ya!